Cold Air Intake For EFI
Celicas
A simple modification
is the removal of the stock airbox and filter and changing it out for a
free flowing gauze type filter. Begin by removing the stock air filter,
unhook the three clips that hold the cover on. Once you have the
cover and filter out of the way. Remove all the bolts holding the
Airflow meter and Filter plate. Be sure to save the four bolts that
secure the black plate to the Airflow Meter, you will need to use these
again. Next cut about 3/4 of an inch off the rubber air duct where
it attatches to the Airflow meter. Then reattatch it with a new hose clamp.
This might take quie a bit of force due to the age of the material, some
lubrication will help this. This is also a good time to clean up
the inside and outside of the Airflow Meter. Clean it inside and out with
some carburetor cleaner and use a small wire brush on the outside to loosen
caked on dirt.

The next step is to create some type
of bracketing to support the Airflow Meter and the new air filter.
I used some aluminum stock that I bought at the local home improvement
center for less than 2 dollars. Plus a few machine screws with matching
nuts and washers. The bends are slitghtly greater that 90 degrees
to match the slope of the fender wall. You will need to remove some
material from the brackets to allow them to clear the edge of the intake.
Once you have made these fit snugly around, drill holes to align with the
Airflow meter adaptor which can be purcahsed from Cyberspace
Automotive Performance . Next take the four bolts you removed
from the black plate I mentioned earlier, you will need to cut off
the solid washers leaving only the lock washers. I used a pair of
diagonal pliers to accomplish this, just be sure to wear eye protection
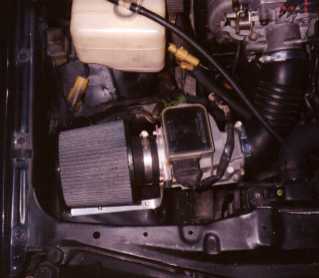
as the pieces will go flying. Now you can bolt the Airflow Meter, adaptor
plate, and the support brackets together as shown above. The brackets will
support front to back motion and the intake hose and brackets work together
to support side to side movement. It is amazingly sturdy, I even
suprised myself at how well this worked. In the next picture you
can see the 5" S&B Powerstack filter fully installed. The picture
shows it has plenty of clearance on all sides.
All Questions and comments can be adressed to
wjh@ufl.edu
Home
Created with netscape composer
4.7 on May 30, 2000