For the tftp server, I used Walusoft's TFTPServer32Pro v3.4, found in their site www.walusoft.co.uk
>>cnfg
 7: KN02-AA  DEC      V5.3t    TCF0  (0220cpu with  16 MB memory)
 6: PMAD-AA  DEC      V5.3a    TCF0  (enet: 08-00-2b-17-91-25)
 5: PMAZ-AA  DEC      V5.3d    TCF0  (SCSI = 7)
>>
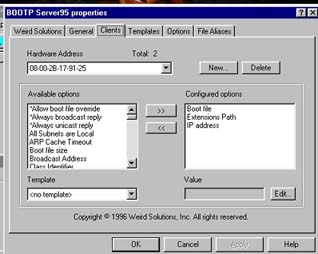
As it can be seen, the hardware address is 08-00-2b-17-91-25. Then,
double-click on Boot file, Extensions Path, and IP address under
Available Options, which makes them be added to Configured options. You should end
up with something like what is shown below:
Going to the Configured options list, select IP address and then enter on the bottom (in the rectangle under "Value:") the IP address for the machine. Then, do the same for Extensions Path, entering now the path to the install kernel file. Finally, under Boot file, enter the name of the kernel boot file. Close the dialog box, check that the bootp is up (under Service) and then go to TFTP server.
In TFTPserver, Select System->Setup->Outbound file. There enter again the path to the install kernel file as the Outbound file path. I have "Enable Paths" checked on. I also have "Only Send This FIle" enabled and entered the name of the kernel file. Check to see that it is serving (under File).
That is pretty much it.
Now, go to the workstation and tell it to do a netboot. In my DEC, the command is
>>boot 6/tftp
But, I do not have the foggiest idea about your setup. My experience is that this takes quite some time to work. In my setup, tftp server had 3 timeouts before finally working. So, do take your time. However, it has always worked with me when I used these two programs.
Once the miniboot starts, it will take you to the installation process. For reference, here is what it looks like in mine. In this example, I am using a little 100MB SCSI drive
>>boot 6/tftp
993648+2142608+143892
Copyright (c) 1996, 1997, 1998, 1999
    The NetBSD Foundation, Inc.  All rights reserved.
Copyright (c) 1982, 1986, 1989, 1991, 1993
    The Regents of the University of California.
All rights reserved.
NetBSD 1.4.1 (RAMDISK) #15: Sat Jul 17 02:18:16 EST 1999
    root@vlad:/usr/src/sys/arch/pmax/compile/RAMDISK
DECstation 5000/200 (3MAX)
real mem  = 16777216
avail mem = 11186176
using 409 buffers containing 1675264 bytes of memory
mainbus0 (root)
cpu0 at mainbus0: cpu0: MIPS R3000 CPU Rev. 2.0 with MIPS R3010 FPC Rev. 3.0
cpu0: 64kb Instruction, 64kb Data, direct mapped cache
tc0 at mainbus0: 25 MHz clock
ioasic0 at tc0 slot 7 offset 0x0
dc0 at ioasic0 offset 0x200000
mcclock0 at ioasic0 offset 0x280000: mc146818 or compatible
le0 at tc0 slot 6 offset 0x0: address 08:00:2b:17:91:25
le0: 32 receive buffers, 8 transmit buffers
asc0 at tc0 slot 5 offset 0x0 (bus speed: 25 MHz) : target 7
Beginning old-style SCSI device autoconfiguration
rz0 at asc0 drive 0 slave 0 QUANTUM P105SS 910-10-94 rev A.1
rz0: 100MB, 1019 cyl, 6 head, 33 sec, 512 bytes/sect x 205075 sectors
md0: internal 2048K image area
boot device:
root on md0a dumps on md0b
WARNING: clock gained 23 days -- CHECK AND RESET THE DATE!
root file system type: ffs
Terminal type? [rcons]
erase ^?, werase ^W, kill ^U, intr ^C

 Welcome to sysinst, the NetBSD-1.4.1 system installation tool.
 This menu-driven tool is designed to help you install NetBSD to a hard
 disk, or upgrade an existing NetBSD system, with a minimum of work.
 In the following menus, you may change the current selection by
 either typing the reference letter (a, b, c, ...).  Arrow keys may also work.
 You activate the current selection from the menu by typing the enter key.

 If you booted from a floppy, you may now remove the disk.

 Thank you for using NetBSD!
From here on, you can go back tot he netbsd installation notes, configure the hard drive and install netbsd. As I said before, I installed it by using the PC as a ftp server.