Utility
The Utility Applets are a set of general utilities to use in your work environment.
Clock Applet
The Clock applet is the only applet which is loaded by default when you install GNOME for the first time. To access the clock properties right mouse click on the clock and select the Properties menu item from the pop-up menu. The Clock Properties dialog box will appear allowing you to specify whether you would like 12 or 24 hour time to be displayed.
Printer Applet
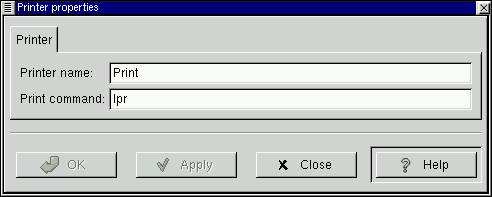
The Printer Applet is represented by a small printer icon that lives on your Panel. If you drag a file to the Printer Applet it will print the file for you. To set up the Printer Applet right mouse click on it and select the Properties menu item from the pop-up menu. This ill bring up the Printer properties dialog box. In this dialog you may specify a printer name and the Print Command. For most systems the Print Command will be
lpr |
Figure 11-7. The Printer Applet Properties
Drive Mount Applet
On many Unix-like systems, after inserting a disk you must tell the computer to mount it in order to use that disk.
The Drive Mount Applet allows you or your systems administrator to mount a drive on your system by simply clicking the icon on your Panel. In order for this to work you will to have to set the drive you want to access as user mountable.
This can be done quite easily if you have linuxconf installed on your machine. Just select the drive you want to access in the Access local drive section. In the Options tab select the User Mountable option. Your drive will now be mountable by users.
If you do not have linuxconf you must edit your /etc/fstab to include user access. This is done by adding user access to the drive. For Example:
If your fstab file looks like this:
/dev/cdrom /mnt/cdrom iso9660 exec,dev,ro,noauto 0 0
|
/dev/cdrom /mnt/cdrom iso9660 user,exec,dev,ro,noauto 0 0
|
Now that you can mount the drive without being root you may add the Drive Mount Applet to your panel by selecting Drive Mount from the Utilities menu in the Add new applet menu.
You will see a small drive image on your Panel that looks like a floppy drive.
Figure 11-8. The Drive Mount Applet

The Drive Mount applet will always default to access your floppy drive. You may change this by right mouse clicking on the applet and selecting the Properties item from the pop-up menu.
Figure 11-9. The Drive Mount Applet
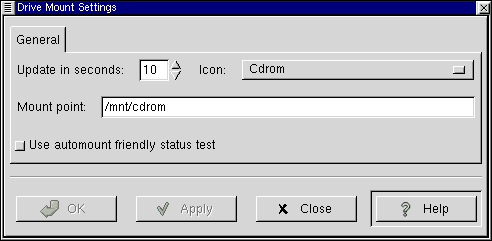
The Drive Mount Settings dialog allows you to define which drive you want to mount and where it is located.
The first option is how many seconds you wish to have before the applet updates. This will check the drive to make sure it is still mounted (in case it was unmounted by other means) and will display the applet correctly.
The second option you have is which icon to be displayed. You have a choice of four icons, Floppy, CDROM, Zip Disk, and Hard Drive. After you have selected the icon you must put the correct mount point for the drive in the Mount point text box.
The last option to set in the Drive Mount Settings is whether or not you wish to Use automount friendly status test If you are using a system that utilizes autofs to auto-mount your drives the Drive Mount applet might interfere with autofs. If this is the case you should select this option. If you are not using autofs(which is most likely the case) do not select this option as it is taxing on your system and is much slower.
GNOME Pager
The GNOME Pager is an applet that will show you all of your virtual desktops and the applications within them. There are two main areas on the GNOME Pager, the desktops view and the applications view. In the desktop view all of your desktops will be represented as a small rectangle. If there are any applications on the desktops, they will show up as small outlines according to their position on the desktop. The Applications view will show you the applications on your active desktop in a list view. If you press the button in the middle that contains the arrow it will show you a view of all desktops and list the applications that are currently on them.
Figure 11-10. The GNOME Pager

NOTE: If windows "disappear" from your screen when you iconify them, just add a GNOME Pager to your Panel.
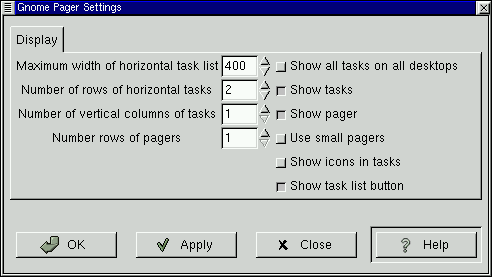
You may access the GNOME Pager properties dialog with a right mouse click on the Pager and select the Properties menu item from the pop-up menu. On the left side of the GNOME Pager properties you may adjust: the maximum width of the task list, the number of rows in the task list, the number of columns in the task list and the number of rows in the pager. On the right side of the GNOME Pager properties you may turn on and off certain views on the Pager including: a view of all applications on all desktops, the tasks list, and the Pager view. You may also choose to use small pagers and include icons in the task list.
Figure 11-11. The GNOME Pager Properties
Quicklaunch Applet
The Quicklaunch Applet is a small applet that gives you a repository to place launchers. The Quicklaunch applet holds the application launchers you wish to have and allows you to click on them to launch the applications. Drag and drop functionality makes the set up of the Quicklaunch applet very easy and quick.gtk
Figure 11-12. The Quicklaunch Applet

To add a launcher to the Quicklaunch applet you must already have the launcher set up in either the Main Menu or on your desktop. Once you have the launcher you may drag it onto the Quicklaunch applet to create a small launcher button. To launch the application simply press the launcher button.
To drag a launcher from you Main Menu click once on the menu to open it, and click once on the sub menu to open it. With you left mouse button click and hold the application launcher and drag it to the Quicklaunch applet and release.
Once the launcher is in the Quicklaunch applet you may right mouse click on it and select Properties to change any properties associated with the launcher. The dialog that is launched is the standard GNOME launcher properties dialog which you can read more about in the section called Adding Application Launchers in Chapter 4.