|
Landscape Lighting Done Copyright © 1998 Click here to visit the freeplants.com home page. Click here to
sign up for Mike McGroarty's If you don't want to read my take on this subject, just scroll down this page to check out some really cool photos. Landscape lighting. Where do we begin? This has to be one of the least understood areas of landscape gardening. Not that it's at all complicated, but that most people have this general conception of how landscape lighting should look, and how much it should cost. Landscape lighting has only grown in popularity in the last few years, and like anything else new, people see it, say; "Gee, that's kinda cool!" Then when they see a complete light kit in the discount store for only fifty bucks they grab one, run home and stick these little black piston looking things all over their landscape. Well, not all over because the kit only comes with a limited amount of wire, so they end up jamming them in the area that the wire will reach. Click
here to see one of our plant sales,
photos Of course it's not written anywhere, but there are two basic patterns that you can achieve with one of these light kits. I call them the runway effect, or the birthday cake effect, because after dark all you can see are the lights either lining the driveway or sidewalk, or all scattered throughout the landscape across the front of the house. You can't tell that the homeowner actually spent a considerable amount of time trying to place them strategically. It doesn't matter. Once the sun goes down and you light them up all you see is lights. They don't seem to light anything in particular, they just light up. Of course getting 24 lights for fifty bucks is a good deal, but it is not the lighting that is conducive to a beautiful home. Come on folks. You invest hundreds of thousands of dollars in a beautiful home and furnish it to the hilt. You spend lots and lots of money on landscaping and decking, and who knows what else. Please do not buy a fifty dollar light kit and put it around your house. Spend what ever amount of money is necessary to light the place properly. You will be so happy in the long run. I’m not bashing the companies that manufacture and sell these light kits, they are meeting the demands of the American public. If you're on a tight budget and that's all you can afford, I understand fully. But if you are fortunate enough to be in a situation where you can afford to spend more money, then I encourage you to do so. In a nut shell. Landscape lighting should not be noticeable by day, and at night all you should see is the effect of the light, and not the source of the light.
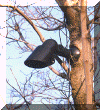
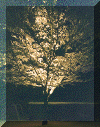
Enlarge the above photo and look at it closely. This is the front of our house. Imagine what that picture would look like if there were a bunch of little black light fixtures sticking up throughout the landscape. Count the number of landscape light fixtures that you see. How many do you see? There are 10 landscape light fixtures in that photo! The only one that is visible is the one under the little green Laceleaf Weeping Japanese Maple in the very foreground of the photo. See it? It's the little black circle next to the base of the tree. This type of fixture is known as a well light. There is a fixture near the base of each of the four brick pillars on the porch. These fixtures wash a very small amount of light up each of the brick pillars, and very lightly illuminate the face board just below the roof line. There is a fixture under the Weeping Cotoneaster at the other end of the porch, this fixture illuminates this plant giving it a very unique after dark appeal. The effect is just as nice during the winter when the leaves are off, especially when they tree is lightly coated with snow. There are two small fixtures that up light the Canadian Hemlock at the far corner of the house. This is a very soft and subtle light, just enough to enhance the silhouette of the tree. And finally there are two well type fixtures behind the Japanese Holly that wash some light up the brick wall at the far end of the house. Click on the photos to enlarge them. Enlarge and check out the above, center photo. This is the same house. You'll have to bear with me, I'm not the greatest photographer. Especially when it comes to time exposed photos such as these. You can see the effect of the lights that are illuminating the brick pillars. You can also see the effect of the light on the Weeping Cotoneaster at the far end of the porch. Now enlarge the photo on the right. This is the same house, just from the opposite angle, and taken during much nicer weather. In this photo you can see that there are also two fixtures that wash some light on the brick wall at the end of the house as well as the brick on the front of the house. You can see the light washing up the brick pillars as well. Once again, the photography isn't the best, this picture is slightly over exposed, making the lighting seem just a little too commercial. The lights actually give the house a soft warm glow. Now enlarge the photo on the left. This house is something like 165 years old, and has a charm all it's own. With just eight, strategically placed low voltage light fixtures we were able to give this home a soft warm glow that just adds to the charm and enchantment. To make it even more appealing this home is located on a country road where there are no street lights. It sets off the road all by it's self, right next to a very old cemetery. A very interesting setting. As you can see from these photos, you don't need 24 light fixtures across the front of a home. Six to ten well placed, good quality light fixtures will enhance the front of just about any home. And enhance is what lighting should do for your home. It should highlight and accent interesting architectural features of your home. The lighting should be soft and gentle. The source of the light (the fixture) should be as inconspicuous as possible. By day, a visitor to your home should not notice the light fixtures. The majority of the light fixtures you should use are "up lights". Fixtures that are installed near or below ground, shining upward to light the desired object. Most manufactures of good quality lighting products make a fixture known as a "Well Light". Well lights are lamps mounted in some kind of a sleeve. Installation is as simple as digging a hole in a strategic location and placing the fixture in the ground. It’s purpose is either to shine light upwards to light an object such as an interesting tree in your landscape, or to wash a spray of light on the side of a wall. I use the Nightscaping® "Lawnliter" (See the photo below.) for these applications. It comes standard with an 18 watt wide angle par 36 lamp, however you can change the bulb for different applications. You can get bulbs as high as 50 watts for this fixture. Keep in mind that these are 24 volt lights, and quite efficient to operate. This is a well type light fixture. I use this type of well light to up light plants in a landscape. You can use it very close to a sidewalk without creating a glare if you install the fixture between the plant and the sidewalk, and angle it about 10 degrees toward the plant. The bulb slides up and down in the plastic sleeve and tips in two different directions. By sliding the bulb down into the sleeve you can concentrate the light into a tighter pattern. Click on the above photos to enlarge them. Looking at the above three photos, the one on the left is a green Laceleaf Weeping Japanese Maple with a well type light fixture installed below it to achieve this up lighting effect. Again, this photo is a little over exposed making the plant appear more yellow than it's true green color. The plant in the center is a Rainbow Dogwood with the same style of fixture up lighting it. The Rainbow is a beautiful dogwood with green and yellow variegated leaves that turn a purplish creme color in the fall. It flowers white. Up lighting only adds to the tree's unique beauty. The photo on the right is the same Rainbow Dogwood. This photo was taken a year or two after the center photo, as you can see the tree has matured some. This was one of those early season snow falls that clings to everything, creating a true winter wonderland. Up lighting deciduous plants gives you the opportunity to appreciate their uniqueness during the winter. Another popular style of an "up light" is a spike mounted fixture that sticks in the ground shining light upwards. I don’t like spike mounted fixtures that protrude from the ground. If prefer to use a spike fixture that I can install as close to the ground as possible. For this I use the Nightscaping® "Mini-Locator". (See the photo below.) This is a spike mount fixture. This fixture comes standard with a 13 watt single contact bayonet bulb. Depending on the application, you can decrease this to as low as 7 watts or as high as 18 watts. I used 7 watt bulbs to wash a minimal amount of light on the brick pillars on my porch, and increase the wattage to 18 watts when washing light up a wall. The are two more types of fixtures that will truly enhance your home. Both are used for down lighting. One is a walkway light that is used for illuminating walks and steps. The purpose of these fixtures is to softly light the walk and steps for safety reasons. When lighting a walkway all you want to do is provide just enough "down" light so the walkway can be safely navigated. You do not want to attract attention to the walkway it’s self. For this I use the Nightscaping® "Footliter". These fixtures use the same bulb as the "Mini-Locator" described above, and deliver a circular pattern of light that covers almost 14’. Therefore you can install these fixtures 14’ apart. Using only two on a 35’sidewalk. The bulb is concealed under the canapé so all of the light is deflected downward and there is no glare in your eyes. This is much more appealing than a bunch of little black plastic fixtures lining your sidewalk glaring in your eyes. The other down lighting fixture I use quite often is the Hadco® Spot light. This is a fixture that you can mount in a tree and shine down to light a bed of flowers. With this fixture you can also change the bulbs to achieve the desired effect. They are available in wide angle, normal, and spot light patterns, with wattage from 20 to 50 watts. I have three trees in my front yard, each has a large bed around it. These beds are full of bulbs for early spring blooms, and then I plant annuals when the bulbs are done blooming. I have one light in each tree shining down on these flowers. It’s beautiful site from the front porch. Click on the photo to enlarge it. As you can see from the above photo the bulb in this Hadco® fixture is recessed so the source of the light is concealed even though the fixture is mounted in a tree. Click on the photo to enlarge it. As you can see by the above photo just one fixture mounted in the tree facing upward illuminates this snow covered White Dogwood. This is the same Hadco® fixture as pictured above. It can be used as either an up light or a down light. We have a brick patio in the middle of our backyard with two large trees on each side and a small pond and waterfall on a third side. Next spring I am going to mount three of the down lighting fixtures in these trees. Two will wash some gentle light down on the patio, while the third will be a spotlight, highlighting the waterfall and the plantings around it. You only need 18 gauge wire to run up the side of the tree, while you should use 12 gauge in the ground. I have twenty light fixtures in and around the landscaping at my house, yet when someone visits during the daylight hours they seldom notice even one. After dark no one drives past our house without noticing the lighting. At night you still can not see the fixtures, and in most cases can’t even determine the source of the light. All you see is house with a soft warm glow, beautiful beds of illuminated flowers in the front yard, and specimen trees in the landscape that seem to have a magic glow to them. One of the biggest advantages to using professional lighting equipment is that you can design anything you want. Putting any fixture you want, anywhere in your yard you would like to have it. These systems are still only 12 volts and quite inexpensive to operate. They are easy to install, and the effect is breath taking. But, yes they do cost considerably more. So what! We Americans spend money on the craziest things anyway. This systems operate on only 12 volts so not only are they efficient to operate, but they are a safe as well. Running the wire from fixture to fixture is as simple as making a slice in the ground and pressing the wire into it. Make sure you use wire that is designed for 12 volt systems, as well as being direct bury cable. Making the connections at the lights is simple. If you are not experienced or comfortable working with electricity, I strongly recommend you hire an electrician to help you. You have a 12/2 cable coming to the fixture, and a 12/2 cable leading away from the fixture on to serve the next light in the system. Each fixture has a 18/2 lead already attached to it. All you have to do is connect one lead from each cable together and secure them with a twist on wire nut. So each wire nut will contain one lead from the incoming cable, one lead from the outgoing cable, and one lead from the light fixture. Tightly wrap each connection with electrical tape. If you expect to have wet conditions around your connections you can fill around the bottom of the wire nut with silicon caulk before you wrap the connection with tape. I recently designed and purchased a system for a relative. It was 13 fixtures, wire and transformer. The cost was about $850. But do you know what? Their home is the most beautiful in the neighborhood at night. And do you know why? Because everyone else in their development, you guessed it, bought one of those wonderful little light kits! How much does it cost to operate this type of lighting? Let's say you install ten fixtures with an average wattage of 18 watts. That's a total of 180 watts. Your electric company charges you by the kilowatt hour, which is 1,000 watts being used for a period of one hour. If you leave your landscape lights on from 5:00pm until midnight, that's 7 hours, times 30 days a month, equals 210 hours per month. Times 180 watts, equals 37,800 watts, divided by 1,000 (one kilowatt hour). That's 37.8 kilowatts per month. At 8˝˘ per kilowatt hour, that amounts to $3.21 per month. The security alone is worth that. Statistics show that lighting is the greatest deterrent to crime. During the summer your light won't even come on until 8:30 or 9:00 p.m. To determine what size transformer you need to buy just add up the wattage of all the fixtures you intend to install. Try and match the wattage as close as possible. You can buy the transformer a little larger than you need to allow room for expansion on the system, however, this will shorten your bulb life. You should be using at least 80% of the transformer's available power. Where do you buy good quality landscape lighting? You will have to go to lighting specialty store, and even then you may not be able to get what you want. Call around. Click
here to see one of our plant sales,
photos
|


